Chances are, that if your home was built or remodeled before 1978 then it may contain lead based paint. This year the EPA announced a new rule that went into effect this last April. Any Repair, remodeling, or Painting (RRP) that takes place in a home built before 1978 and and disturbing more than 6 sqft of painted surface indoors requires contractors to take specific precautions, to protect homeowners and residents from lead poisoning. A number of the new requirements including testing for lead paint, getting waivers signed, providing homeowners with lead paint literature and brochures, installing plastic barriers, wearing respirators, removing waste properly, and completely cleaning up any contaminated dust.
Below is an example of the plastic barriers that I installed in a home recently. I needed to cut through 30+ sqft of double layered plaster with multiple layers of paint, in order to access some water damage from leaking plumbing. Saws and sanders create a tremendous amount of dust , so the idea is to prevent that dust from leaving the work area, ventilating it outside through a HEPA filter, and being able to roll everything up and carry it out before doing a final cleanup. Its a very time consuming and expensive process, but it can help protect people's health, and keep a home cleaner. In this circumstance, no lead based paint was found, but i wanted to protect the homeowners from the dust because of their allergies and asthma.
Saturday, May 29, 2010
Soffit, fascia and gutter repair
That blizzard we had this winter did a number on a lot of homes. This house lost all the gutter fascia and soffit on the front. I managed to replace it all, only after my siding brake broke, and I spent $300 on the repair kit for it. Wear and tear on tools and equipment is expensive.
Tile shower in progress
Another bathroom that I worked on recently. It needed to be finished in a hurry so that the customer could get moved into the home. The only problem was that someone else started it, and just about everything was wrong. I had to rip out everything and start over, otherwise the shower would have started leaking in no time. I used GP's fiberglass lined backer board and redguard to water proof the shower and as a backer for the tile. In addition to the tile I redid most of the drywall and tile on the floor. I also had to heavily modify a pocket door that someone else installed that actually pocketed behind the shower, to stiffen it up and make sure everything would remain solid.
Thursday, May 13, 2010
New Basement Half Bathroom
Originally an empty unfinished basement. Framing, drywall, paint, tile, then add some fixtures and now a finished bath. Tough to photograph.
Tuesday, May 11, 2010
Roofing in the heat.
A good friend purchased a HUD home a few weeks ago and he needed some help on his roof. Most of the house had already been re-roofed, but one section 25' by 43' still needed to be redone. As you can see, we tore off the old shingles and patched some holes in the roof decking, laid new tar paper, and then I proceeded to run all the new shingles, while the homeowner addressed the ridge vent and wall/valley flashing. We finished in time for me to leave for a wedding by 3pm, and the homeowner was able to get the flashing done before it rained the next day. It was the hottest day of the year so far, and if i stood still for more than a few seconds I would stick to the shingles.
Note to self, friends don't let friends buy shingles at Lowes.
Note to self, friends don't let friends buy shingles at Lowes.
Saturday, May 8, 2010
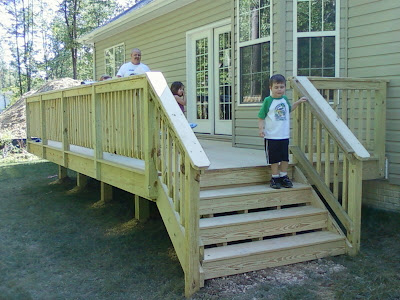
Just a quick Deck
This was a fun project, and pretty simple. I actually spent more time driving to Annapolis to pull the permits, and driving to the lumber yard to order materials (no phone orders), than it actually took to build this deck. The HOA required the deck to be all wood construction, no synthetic decking. The steps are 5 foot wide, with a 10 foot by 22 1/2 foot frame. The homeowner and I are internet friends, and share a common love for Jesus, so it was a pleasure to work for him.
On to the pics!
On to the pics!
Subscribe to:
Posts (Atom)


